This is no surprise since their customer service was so abhorrent. Since I first put up this page, many people have sent me e-mail telling of horror stories of having problems with their EPS computers (which should have been under warranty) and receiving zero satisfaction from EPS. The marketplace has dispensed justice on EPS; they went belly up (rather abruptly, it seems).
On a related note, Chicony America's web site was offline for about a month. This scared me quite a bit at first. I hoped that it was not an indication of their impending failure! But, It's back up now.
I had replaced the Chicony links on this page with links to their Taiwan Site while their US one was offline. I have now restored the links to the US one now that it is back up.
Use this information at your own risk! You are strongly encouraged to learn everything you can about the hardware in your laptop and about the Linux functionality you intend to set up before proceeding with your own installation. Manufactures often change the guts of a machine without changing the model number or even the revision number. Your EPS Apex XC-200 or Chicony MP-975 might be different from mine!
The author will not accept any liability for data loss or other loss arising out of the use or misuse of this document!
ANOTHER DISCLAIMER: The author of this document is not affiliated with Chicony Electronics, EPS Technologies, or any of their resellers or partners. The author does not derive any financial gain from the creation and maintenance of this document. This document is intended for informational and educational purposes only and is not intended to imply an endorsement of any product.
Copyright (c) 1998 Mark Sutton
Author: Mark Sutton -- marksu@spectra-one.com
Reseller: EPS Technologies (Now out of business.)
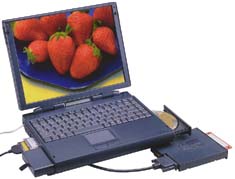
Chicony Model: MP-975
EPS Model: Apex XC-200
Processor: Intel P200MMX
Ram: 32 Meg (standard)
Hard Drive: 3.2 Gb (upgraded, 2.1 Gb Standard)
Display: 12.1" active matrix
Video Chipset: Chips and Technologies 65550
PCMCIA Controller: Texas Instruments PCI-1130
Pointing device: Integrated touchpad (ps/2)
Audio: ESS 1788 Audio chipset - Teeeny-weenie built-in speakers.
Modem: Motorola MobileSurfr 56k - 56 Flex protocol, PCMCIA PnP.
Power Sources: Lithium ion battery, AC adapter, car adapter. Second battery (which I have not yet purchased) can be plugged into the floppy/CD-Rom slot, computer will automatically switch from battery 1 to battery 2 when 1 gets low.
Additional features:
The machine, with shipping and everything, cost $2,606. To get the same features in a "mainstream" brand (e. g. Toshiba, NEC, Compaq, IBM, etc.) I would have had to spend at least $5000.
The machine appears solidly built and is reasonably small and light. It is one of the thinnest laptops I have seen, probably due to the fact that it can't have both the floppy and CD-rom drives inside simultaneously. It also has passed several hardware stress-tests I have imposed on it, not the least of which is numerous re-compiles of the Linux kernel without a hitch.
The vendor, on the other hand, EPS Technologies, is another story. They have the absolute WORST customer service and support I have EVER seen or even heard of. It took them a month to respond to a trivial problem (the car adapter arrived with a smashed cigarette lighter plug). One full month of almost daily calls, emails, and faxes before they even acknowledged my existence! Suppose I had a serious problem, like bad memory for instance? Would I have had to badger them for a month or more to solve the problem? Apparently!
The above was written before EPS justly went belly up, presumably because of this horrible customer service. (12-2-98)
In conclusion, I would recommend the hardware, but not the vendor. If anyone knows a competent source of Chicony computers, let me know.
When I ordered the computer, I had planned to divide the disk about in half, 1.5 Gig for Linux and 1.5 Gig for Windows95. (My wife uses the computer in her accounting business. And... I must admit my work requires occasional access to windows too... Can't be completely Microlimp free, I'm afraid -- sigh...)
Anyway, the computer was delivered with two DOS partitions, one 2 gigs in size and the other 1 gig (approximately). It seems that Windows95 isn't happy with vfat partitions over 2 gig. (I had been vaguely aware of this, but it had slipped my mind...)
So, I saved myself the trouble of using fips to shrink the Windows95 partition and just deleted the 1 gig DOS partition and used that space for Linux. If the Linux partition gets full, I can always dump lesser used Linux files into the Windows95 partition.
I used Linux fdisk, as I began my installation, to create a partition table that looks like this:
/dev/hda1            2        2       11    40320   84  Unknown
/dev/hda2          770      770      785    64512   82  Linux swap
/dev/hda3           12       12      531  2096640    6  DOS 16-bit >=32M
/dev/hda4   *      532      532      769   959616   83  Linux native
Note that the Linux native partition is bootable, lilo is installed in it. I did this very deliberately, more on this later.
Also note that the partition numbering is out of order. My swap partition, /dev/hda2, is actually last on the disk. For some bizarre reason, EPS configured the machine with the STD partition as number 1, the "C" drive as 3 and the "D" drive (which I deleted to put the Linux partitions in its space) as partition number 4. They skipped number 2. Fortunately, neither Linux or Windows are complaining about this out of order numbering, so neither will I.
Partition 1 is the Suspend To Disk (STD) partition. The STD feature is working in Linux as well as in Windows. There is a caveat about using suspend in Linux, however.
Floppy Drive:
I had wondered if a CD-Rom installation would even be possible. Since the
CD-Rom drive and floppy drive cannot be on board simultaneously, and using
them simultaneously requires that the floppy be plugged into the parallel port,
I had assumed that they probably used some weird window's only driver to talk
to the floppy through the parallel port. I was pleasantly surprised to learn
that some sort of PLA is used to detect when the floppy drive is plugged into
the parallel port and actually make it become a floppy port, down to the
very lowest level. I just put the RedHat CD into the CD rom drive, the boot
floppy into the floppy drive plugged into the parallel port, and away I went!
Disk Partitioning
As mentioned above, EPS somehow created partition numbers 1, 3, and 4, and
managed to skip number 2. During my initial installation, I used fdisk to
create partitions as shown above.
Since there were already two Windows 95 partitions, I was able to just delete one to make room for linux.
The Linux root partition is made bootable and Lilo is installed there. Certain configuration actions in Windows95 will nuke Lilo if it is installed in the Windows partition. Installing Lilo in the Linux root partition prevents this. Also, installing lilo at the root of the disk (essentially in the STD partition) will disable the STD feature of the computer. Read on for further info. Certain configuration actions might cause Windows95 to reset the bootable partition back to the Windows partition (3 in this case). But you then need only to go into Windows fdisk and set it back to the Linux root.
STD Partition
Be careful not to touch the STD partition. I'm told if you hose it, the
utility that re-creates it wipes out your entire partition table (erasing
the hard disk, for all practical purposes). As long as this partition remains
intact, the suspend feature works both in Windows95 and linux.
You must also not install Lilo to the root of the disk, install it to your root Linux partition, then set that partition bootable. This leaves the original MBR of the disk intact. It is this MBR that finds the STD partition, then finds the "boot from" partition, in this case, the one that contains Lilo. In other words, the STD MBR must do it's thing, then call Lilo, which does its thing.
Caveat about using suspend in Linux: Before suspending, be sure to do a "cardctl suspend" for each active PCMCIA device. Then do a "cardctl resume" after you come back up. If you fail to do this, the PCMCIA drivers get all confused and you'll end up rebooting (at least this is probably the simplest way) to get your cards working normally again.
Red Hat Installation
Couldn't have been easier. I just picked the packages and configurations I
wanted and let-er-rip.
Having always used slackware in the past, I particularly liked the way Red Hat included a pretty decent initial X configuration in the install. It was nice to be able to type "startx" right after installing and actually have an X session start!
Fstab Fix
One of the first things you'll probably want to do is fix fstab so that you
can read and write long filenames in the Windows95 partition from Linux.
To do this, simply change the fstype description in /etc/fstab for your
Win95 partition from "msdos" to "vfat".
My fstab looks like this (Do not copy it!, this is an example only!):
#
# /etc/fstab
#
# You should be using fstool (control-panel) to edit this!
#
# device    mountpoint   filesystemtype options dump fsckorder

/dev/hda4                 /                         ext2   defaults 1 1
/dev/hda3                 /dosc                     vfat   defaults 0 0
/dev/cdrom                /mnt/cdrom                iso9660 noauto,ro 0 0
/dev/fd0                  /mnt/floppy               ext2   noauto 0 0
/dev/hda1                 none                      ignore  0 0

none                      /proc                     proc   defaults
/dev/hda2                 none                      swap   sw
 Back to Contents
My initial HorizSync value was 30-64, I changed it to 30-40.
I lowered VertRefresh from "50-100" to "50-90".
These two adjustments gave me a stable, flicker-free display in all modes.
I also lowered the "virtual" value in all modes from 1280X1024 to 800X600. 800X600 is the highest resolution that the LCD can display and it drives me nutty to have a virtual desktop bigger than I am able to display all at once!
Have a look at my XF86Config file. The usual disclaimer applies to just copying it.
I like some of the features in Red Hat's "TheNextLevel" configuration of fvwm95 (such as the function key shortcuts), but I didn't care for the look and feel too much. I am currently in the process of melding the "default" fvwm2rc95 file and the "TheNextLevel" configuration into something that hopefully will be REALLY COOL(tm). (IMHO, anyway). I'll post it here when I deem it "Cool" enough :-).
Upgrade to XFree86 3.3.1
According to the good folks at Xfree, 3.2 (that came with Red Hat 4.2) only
marginally supports the C&T 65550 chipset. So, I upgraded to 3.3.1.
Here are the installation instructions. The C&T chipset uses the SVGA server.
So far, I have noticed one obvious improvement. The 3.2 server would "letterbox" the display when dropping from 800X600 to 640X480. Nothing in the image would appear to get any larger, but rather, a big black boarder would just mask the edges of the screen. The server in 3.3.1 will actually zoom the 640X480 image to the full screen. In addition, the 3.3.1 server may be a bit quicker on the draw.
One interesting note: The Windows95 driver for the 65550 letterboxes the display in 640X480 like the old 3.2 server does. So Xfree has done it better than Gates & Co. (Not that that is too hard :-) )
And finally... WARNING WARNING WARNING, DANGER, DANGER, DANGER!!!!! Do NOT get X331cfg.tgz. It will delete your nice sophisticated xinitrc file and replace it with a terribly simplistic one that starts twm by default, for heaven's sake! This happend to me. I was really annoyed. "What about backing up /usr/X11R6 before upgrading", I hear you say! "I did", I reply, "but /usr/X11R6/lib/X11/xinit (where xinitrc is kept)is just a link in red Hat (to /etc/X11/xinit)." So, all I backed up was the link. "Well what about a full system backup", you say. "Yes, yes, shame on me. Shame, shame, spank, spank!" Anyway, I had to essentially recreate xinitrc from scratch, a real pain! It might be a good idea to hide a copy from the Xfree install scripts somewhere, just in case!
2/15/98: I found that occasionally the scanning frequency wouldn't be right when coming out of X back to a text screen. I added the line "TextClockFreq 25.175" to the "Device" section of my XF86Config file. This should clear up this problem.
4/2/98: Nope, the above didn't fix it. Back to the drawing board...
Currently (4/2/98) the latest version of Xfree86 is 3.3.2. I do not believe there are any relevant differences with respect to the C&T chipsets between 3.3.1 and 3.3.2. (3.3.2 basically incorporates the S.U.s.E. servers into the main Xfree86 distribution.) In other words, the above stuff should apply to 3.3.2.
12/2/98: Xfree86 3.3.3 is out. There don't appear to be any changes vis-a-vis this chipset, So, i'll not bother to upgrade, once again. (3.3.3 was a godsend for those Matrox G200 cards we have at the office, tho...)
IRQ: 5
I/O base: 220
DMA 8 bit: 1
DMA 16 bit: 1
In addition, I de-activated most of the modularized drivers that Red Hat has activated as they were not needed.
When recompiling the kernel, be sure to activate "apm" (Advanced Power Management), and PCMCIA support. For more information, see the Advanced Power Management section of this document.
Advanced Power Management BIOS support: yes.
Ignore USER SUSPEND: no.
Enable PM and boot time: yes.
Make CPU Idle calls when idle: yes.
Enable console blanking using APM: no.
Power off on shutdown: yes.
Note that "Enable console blanking" is disabled. If you have this turned on, you just get a lot of error messages on the display as the APM code tries, and fails, to turn off the display. (The regular screen saver feature can be used to "blank" the screen, of course, but APM can't turn the backlight off.) This feature works in windows, it could be that the APM bios is not 100% standard. I have heard that this feature can't be made to work in Linux on all laptops. I may try some hacking of the apm code to fix this, but I'm not optimistic. (This is probably a proprietary windows related thing.)
I also installed the apmd package. You can get it here.
The apmd utilities are rather useless on this particular laptop right now because the most important thing the package gives you is a battery monitor and battery monitoring support is broken in this computer's bios! The symptom is that apm under Linux reports battery status as "unknown", and xapm is stuck at "0:00". The Windows 95 battery meter is perpetually stuck at 75%.
EPS claims in a FAQ on their web page that Chicony is working on this problem and hopes to have it fixed in a future bios release. However, I recently made an inquiry about this to Chicony's tech support email address in Taiwan, and received the following response:
Mark,

First of all, 975 do not support smart battery, so Windows 95 cannot detect the
battery power left in the battery. It will only show 25% - 75%. There is no BIOS
fix for this problem.

Best regards,
James Tam
The sad part is that Chicony is most likely right on this issue and EPS is most likely wrong.
This is a pity because the only warning that you get that the battery is nearly dead is the computer beeps three times and then auto suspends. (Well, at least it suspends!)
Expect to find tips on maximizing battery life on this page in the near future.
I came to the point where I needed a newer kernel for two reasons:
Actually, I first upgraded to 2.0.34, then shortly thereafter, I upgraded to 2.0.35, but the issues are relatively the same, so I will pretend it was all one upgrade.
Before starting. Get the PCMCIA package version 3.0.4 or later. Any earlier version will not work with 2.0.35! If you don't do this before compiling the new kernel, and your link to the net is via modem, and your modem is PCMCIA, you'll kind of be up a creek if you don't get this first!
Actually, I scarfed 2.0.35 off of www.kernel.org within hours after it first appeared. PCMCIA 3.0.3 was the latest available and I had to hack it myself to get it to compile. This was not pretty... PCMCIA 3.0.4 showed up about a week later.
I always upgrade a kernel on a RedHat machine using the following steps:
Read the next section...
First: get it.
You must get 3.0.4 or newer! Older ones do not work with kernel 2.0.35!
Next, backup the following directories. The PCMCIA package will write into them and you want to be safe. Backup: "/etc/pcmcia", "/etc/rc.d", "/lib/modules". Also make a copy of the old /sbin/cardctl and /sbin/cardmgr executables.
Follow the directions to compile and install the PCMCIA package.
Reboot and test the operation of all your PCMCIA devices.
Besides the modem mentioned elsewhere in this document, I've recently purchased an Adaptec 1460 SlimSCSI card. Both worked fine after this update. (Well, I had a little more trouble, I first hand hacked 3.0.3...)
You need to enable three drivers in the kernel, and, unless you plan never to plug anything but the HP Colorado 5gb into the parallel port, you need to enable them as modules. In fact, enable anything that is going to use the parallel port as a module, or they'll step on each other and not work.
The three drivers that need to be enabled are the Parallel IDE devices driver (paride.o), the Shuttle EPAT driver (epat.o), and the Parallel Tape driver (pt.o). They need to be inserted via insmod in that order.
I have put the following line in /etc/rc.d/rc.local to enable the line printer by default:
insmod /usr/src/linux/modules/lp.oI've also made a script to get the tape ready for use. It looks like this:
rmmod lp
insmod /usr/src/linux/modules/paride.o
insmod /usr/src/linux/modules/epat.o
insmod /usr/src/linux/modules/pt.o
Note that the tape drive must be pluged in before executing this or it will bomb. (It's generally a bad idea to plug in a parallel device with either the device's or the computer's power on by the way. Shutdown or suspend first.)
I have another script to restore line printing. It looks like this:
rmmod pt
rmmod epat
rmmod paride
insmod /usr/src/linux/modules/lp.o
You have to have these in this order or you'll get "device busy" errors on paride and epat and they won't unload.
I have been trying out KBackup. I had used "tob" for years. They both seem to be able to produce compatible afio archives. I'm trying to decide which I like better.
Both have the disadvantage that they don't seem to be able to create multiple archives per tape using the Colorado 5gb drive. (However, they can on some drives.) Multiple archives sure would be nice because these tapes are $30 apiece!
Drop me a line if you know of a backup utility that can make multiple archives on this drive.
I am producing demo CD's for local bands as well as archiving some of my un-replaceable out-of-print vinyl LP's to CD.
In a nutshell, I got a 2 bay SCSI enclosure (about USD $80) and put a 4x CD-R and a 3 GIG "scratch disk" hard drive in it. I connect it to the laptop via an Adaptec 1460B slimSCSI PCMCIA card. I installed xcdroast (the binary is hosed, get the source and compile it yourself, it's easy) and voila!, I can master audio and data CD's!
The built in sound chips on the 975 are sufficient for archiving vinyl albums, but they are not quite up to the task of digitizing live recordings I have made to DAT. So, I digitize live DAT's via the Ensoniq Audio PCI card in my desktop machine (RedHat 5.2 comes with a driver for it), storing the recordings on the same 3 gig "scratch disk". I can then take the laptop, and the SCSI bay containing the scratch disk and the CD burner to the clients home and compose the CD there. Since the audio files (wav or cdr format) have already been captured by the high quality Audio PCI card, the sound chips in the 975 are sufficient to monitor the result.
 Comments encouraged:
<marksu@spectra-one.com>
Comments encouraged:
<marksu@spectra-one.com>